
Don’t let your living space’s beauty be diminished by frayed or unraveling carpet edges. You don’t need to pay for pricey expert services when you can alter your carpets and give them a polished look with the power of DIY carpet binding.
This in-depth manual will take you on a creative journey and teach you how to effectively bind carpet edges in the convenience of your own home.
A DIY Guide To Revitalize Your Frayed Carpet Edges
As we go step-by-step through the DIY carpet binding process, get ready to rediscover the thrill of owning beautiful carpets. At Carpets Dubai, we’ll begin by outlining crucial advice for cleaning and smoothing up the edges of your carpet in order to prepare them for binding.
After that, we’ll help you choose the best binding options and learn the tricks of the trade for producing outcomes that seem polished. Prepare to reinvent your carpets and show off your ingenuity like never before with DIY carpet binding.
Required Stuff
Get all of the required tools and supplies together before you start the binding procedure. What you’ll need is as follows:
- Carpet binding tape or binding material of your choice
- A pair of sharp scissors or a carpet knife
- A hot glue gun or carpet binding adhesive
- Measuring tape
- A marker or chalk
- A sturdy work surface
To bind carpet edges at home, complete the following procedures after getting your tools and materials ready:
1. Measure and Prepare the Carpet Edges
Measure the length of the carpet edge that requires binding to get started. Make sure you have enough binding material for the full edge by measuring the correct length with a measuring tape. Next, clip any stray or frayed fibers along the edge using a carpet knife or a pair of sharp scissors. For the binding, this will produce a smooth and even surface.
Start by determining how long the carpet edge needs to be bound. Make sure you have enough binding material for the full edge by using a measuring tape to establish the precise length. Use a pair of razor-sharp scissors or a carpet knife to cut any loose or frayed threads that are near the edge. This will provide the binding with a smooth and even surface.
2. Select the Binding Material
Binding materials come in a variety of forms, including carpet binding tape, cotton or synthetic binding cord, and even fabric strips. Choose a material that matches the style you want to achieve and goes well with the color and texture of your carpet. Think about things like application ease, durability, and personal preference.
3. Cut the Binding Material
According to the length of the carpet edge that you previously measured, measure and cut the binding material. To make sure you have enough material, measure an additional few inches. Make a clean, straight cut using a carpet knife or a pair of razor-sharp scissors.
4. Attach the Binding Material to the Carpet Edge
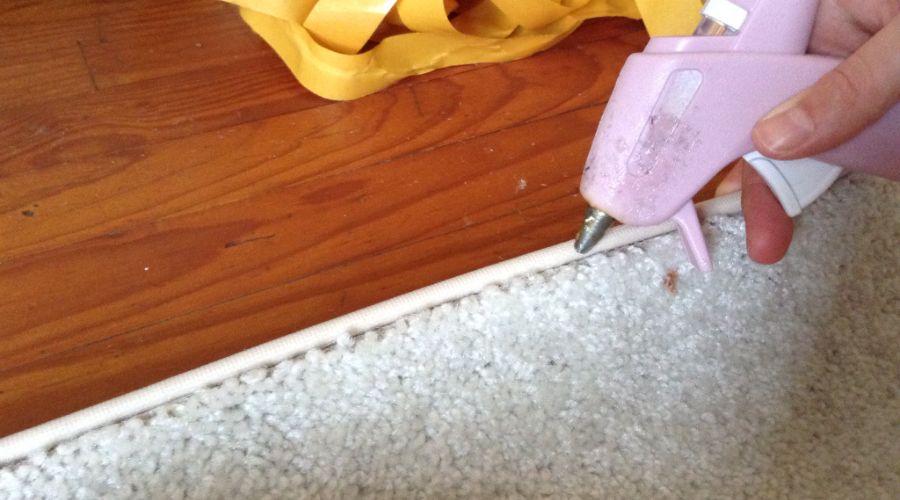
The carpet should be laid out with the edge facing up on a stable work surface. The binding material should be equally spaced along the edge. Peel off the adhesive backing from the carpet binding tape before pressing it firmly on the carpet edge.
Apply a small line of hot glue or carpet binding adhesive along the edge of the carpet if using a different binding material, then press the material into place.
5. Secure the Binding Material
Binding material should be attached to the carpet edge for a solid and long-lasting bond. Apply pressure along the tape’s whole length if using carpet binding tape to make sure it sticks firmly. In the event that a different binding material is being used, carefully apply hot glue or carpet binding adhesive along the bottom of the binding material, pressing it down firmly onto the carpet border.
6. Trim Excess Binding Material
Trim any extra material with a pair of precise scissors or a carpet knife once the binding material has been firmly fastened. Without slicing through the carpet fibers, trim as nearly to the edge as you can. To obtain a tidy and expert finish, take your time and make accurate cuts.
7. Add Decorative Trim (if desired)
You can sew decorative trim or fabric strips to your bound carpet edges if you wish to give them a decorative touch. Trim or fabric strips should be measured and trimmed to fit the carpet edge’s length. Put some fabric or hot glue along the binding material’s edge, then press the decorative trim into place. Before moving or using the carpet, let it fully dry.
8. Allow the Binding to Set
If you want to add a decorative touch to the bound carpet edges, you can sew decorative trim or fabric strips to them. Measure and cut trim or fabric strips to match the length of the carpet edge. The decorative trim should be pressed into place after applying fabric or hot glue to the edge of the binding material. The carpet must be completely dry before being moved or used.
Some Additional Tips
Here are a few additional tips to ensure a successful carpet binding experience:
- Take Your Time: The secret to getting a product that looks professional is patience and accuracy. Rushing the process could result in bindings that are crooked or careless.
- Practice On a Small Area: Before beginning on your main carpet, if you are new to carpet binding, think about practicing on a little patch or an extra piece. This will enable you to become accustomed to the procedure and improve your technique.
- Protect Your Work Surface: To prevent hot glue or adhesive drips on your work surface, lay down a protective covering like a drop cloth or old sheet.
- Safety First: Be careful when using hot glue to prevent burns. Keep a bowl of ice water handy so you may immediately submerge your hand if there is an accident.
- Regular Maintenance: Vacuum your bound carpet edges frequently to get rid of dirt and debris to maintain them looking their best. To prevent loosening the binding material, use caution when vacuuming close to the bonded edges.
To Sum Up!
Remember that DIY carpet binding is an affordable option to refresh your carpets and tap into your creativity. From the comfort of your own home, you can produce results that seem professional with the correct equipment, supplies, and experience. Pull up your socks, get your tools, and start the makeover!

